Task: Branch An Incremental Analysis
Analysis branching is useful if you want to accurately reflect
development branching for a software project, or if you want source
files or procedure information (including metrics) from incremental
ancestors to be available through the hub. For full details, see
Source
Files: Availability and Procedures:
Availability.
You can create a branch in an incremental analysis tree for a
project P at any time by copying P.prj and P.prj_files/ to a new working
directory. To simplify this further, simply copy the entire
directory containing P.prj
and P.prj_files/.
Note that:
- Given an analysis on machine M, you can create a branch on a
different machine N provided that M and N have the same processor
architecture and operating system.
- If the analysis branch is intended to reflect a development
branch, you should copy your development directories at the same
time that you copy P.prj
and P.prj_files/.
If you copy the directory containing the
project files from a CodeSonar build/analysis to a new
location and then perform a build/analysis in that location, this
makes a branch in the incremental analysis tree.

Only the most-recently analyzed versions of the files in each
project analysis directory are available for viewing. In many cases
this will be what you want. If you want all source files from all
incremental analyses to be available, create a new branch directory
each time you perform an incremental analysis. Branching to Maintain Source Code History
provides instructions for this procedure.
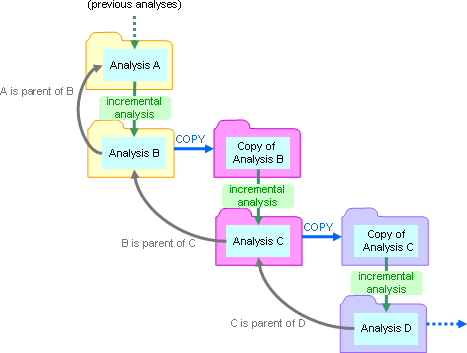
The following diagram shows an incremental analysis tree that has
been branched in this way. The results of analyses A, B, C, and D are
stored on the hub; and the source files from analyses B, C, and D are
available for viewing. The source files from analysis A are
not available: they were replaced by the files for B.
When you are maintaining analysis branches in parallel with
development branches, follow these steps.
In this example we have a software project myproj that is built using a Makefile, and kept
under version control with svn.
- Before you start, make sure you have a hub running at
host:port.
- Initially, software development and CodeSonar analysis is
taking place on the project trunk:
svn co trunk
cd trunk
codesonar analyze host:port myproj make
- Wait for the analysis to finish (the Analysis
State displayed on the GUI Analysis page will be
Finished).
- Print the analysis
ID for your analysis. For this example, the analysis directory
is myproj.prj_files/ (relative to
the working directory).
codesonar analysis_id.py myproj.prj_files
Make a note of the analysis ID. We will refer to this as
aid in the next step.
- Visit http://host:port/command/close/aid
to instruct the analysis
daemon associated with your analysis to disconnect from the hub
and exit. This ensures that all the analysis files are closed and
ready to copy.
- When you are ready to create a development branch, copy the
development directory.
cd ..
cp -r trunk newbranch
Since myproj.prj and
myproj.prj_files/ are children
of trunk, so they will be copied
to newbranch as part of this
operation.
- Inform the version control system that a new branch has been
created.
svn switch svn://svn/branches/newbranch newbranch
- Continue software development and version control updates in
trunk and newbranch as appropriate. (Don't invoke
the software build during this step.)
- Whenever you want to perform subsequent CodeSonar analyses in
either the trunk or the branch, use
cd branchname
codesonar analyze host:port myproj make
where branchname is trunk
or newbranch.
- Steps 7 and 8 can be repeated as often as required.
To branch analysis without branching development (that is, without
maintaining multiple copies of the software source files), it is
easiest to keep the CodeSonar analysis files in subdirectories of the
build directory.
There are two options.
- If you are happy for the analysis directory to be located under
an analysis launch daemon home directory, follow the instructions
for remote-managed daemon mode.
This option is the most straightforward.
- If you want to specify the location of the branched analysis
directory, follow the instructions to branch manually.
Use these instructions if you are happy for the analysis directory
to be located under an analysis launch daemon home
directory.
Otherwise, follow the instructions to branch
manually.
For the sake of this example, assume the following.
- We have a software project myproj that is built using a Makefile.
- The existing CodeSonar analysis build
directory is stored in subdirectory bdir of the software
build directory.
- There is a launch daemon with launch daemon ID
3 running and connected to the hub, and this launch daemon has an
associated home
directory.
Note that the home directory must be specified when the launch
daemon is first started: the codesonar install-launchd command
will be something like the following, where path/to/ldhome is your
selected launch daemon home directory.
codesonar install-launchd -launchd-home
path/to/ldhome -max-processes auto
host:port
Then proceed as follows.
- Before you start, make sure you have a hub running at
host:port.
- Change to the software build directory.
cd software_build_dir
- Run the CodeSonar build/analysis on
myproj, using -remote-archive to specify the launch daemon to
be used for remote-managed daemon mode.
codesonar analyze bdir/myproj -remote-archive -3
host:port make
When the analysis transitions to daemon mode:
Notes.
- If your build command specifes the -remote option (with or without -remote-archive), the analysis phase and
daemon mode will be remote-managed. The goal of maintaining source
code history is also met in this case.
- For CodeSonar SaaS, specify -remote-archive "*/saas/*"
(or -remote
"*/saas/*").
Use these instructions if you want to specify the location of the
branched analysis directory: for example, because you want all
analysis directories to be subdirectories of the software build
directory.
Otherwise, follow the instructions to use a
remote-managed analysis.
In this example we have a software project myproj that is built using a Makefile. The
existing CodeSonar analysis files are stored in a subdirectory
olddir of the software build directory, and the new branch
directory newdir will also be a subdirectory of the software
build directory (and therefore a sibling of olddir).
- Before you start, make sure you have a hub running at
host:port.
- Change to the software build directory.
cd software_build_dir
- Run the CodeSonar build/analysis on
myproj, sending the results to olddir. Call this
analysis A.
codesonar analyze olddir/myproj host:port
make
- Wait for the analysis to finish (the Analysis
State displayed on the GUI Analysis page will be
Finished).
- Print the analysis
ID for your analysis. For this example, the analysis directory
is olddir/myproj.prj_files/
(relative to the working directory).
codesonar analysis_id.py olddir/myproj.prj_files
Make a note of the analysis ID. We will refer to this as
aid in the next step.
- Visit http://host:port/command/close/aid
to instruct the analysis
daemon associated with your analysis to disconnect from the hub
and exit. This ensures that all the analysis files are closed and
ready to copy.
- Copy olddir to newdir, a directory that does not
exist yet.
cp -r olddir newdir
- Continue software development.
- When you are ready, run the CodeSonar build/analysis on
P, sending the results to newdir.
codesonar analyze newdir/myproj host:port
make
The parent of this analysis will be A.
- Steps 4 through 8 should be repeated for each subsequent
analysis of the project in order to maintain full source code
history. The next iteration would use this iteration's
newdir as olddir and create a new newdir.